Following up: “Avoiding the UK IoT Disaster” (BrisTech, 2015-12-03)

I thought I’d take the time to write a short blog post following up on my presentation that I gave to BrisTech the other night (2015-02-03) titled “Avoiding the UK IoT Disaster”. In the talk, I highlighted not security or technical problems with IoT but a key educational problem that will be putting our industry at serious risk: Low-level development is not being taught in schools and is barely taught at Universities. Slides are available here.

During the presentation I highlighted a couple of possible problem-applications, where IoT devices are being programmed using high-level code (often Python) on top of an embedded Linux stacks. Such stacks and programming in Python allows rapid development and ease-of-update in future (which is useful/key for security) but sacrifices hardware efficiency and, even more so, battery life.

The specific example that I brought up was an IoT thermometer programmed in Python with wireless connectivity. I stated during the presentation that such a setup was not a good idea because thermometers were relatively simple devices that didn’t require such a complex stack and also that, as a device installed in a home, you would want a decent battery life.

This example caused some controversy and was the subject of a lot of the discussion at the end of the talk. One member of the audience, who works in the IoT industry, gave an interesting piece of analysis which is where I would like to start. His key point I feel worth highlighting is that, in his work, he sees three types of IoT device:

  1. Long-term, hard-to-replace devices, such as tremor and stress sensors built into bridges which often can’t be replaced, need to be extremely reliable and last a very, very long time (relative to standard technology cycles).
  2. Long-term, easy-to-replace devices, such as the thermometer example I gave earlier. These are devices which the user may want to have for a long time but they are easily replaceable.
  3. Short-term devices, where short-term is roughly the length of a standard technology cycle, 18 months to 2 years. These are devices which we would only expect to last that length of time before they need replacing.

The design approach for type (1) devices is relatively straightforward to analyse. These are devices which we may never be able to replace and which need to last a long time thus battery life is a top priority. So is reliability and security, which is easier to assure when there is less hardware and less software to test. Minimising the amount of hardware and minimising the amount of software executing for any length of time is key to increasing battery life. This is only possible using low-level software where modules can be stripped to a minimum and Python certainly doesn’t come under the heading of “low-power”.

The design approach for type (3) is arguably equally simple because the developers are likely to need the device to come quickly to market and to rapidly develop the next version and the version after that. This means Python and embedded Linux, which has regular security updates, and keep be developed and reasonably tested pretty quickly, makes sense.

The design approach for type (2) is what caused the most debate. Arguably, it is better for the user if the battery life is longer since, for a long-term device, it will be cheaper to not have to replace the battery or entire device so often. However, since the device can easily be replaced, it will probably not be an expensive, critical device with high per-unit margins (or at least, replacing the battery will be cheap so in the long-term, the per-unit profit is massively affected by the initial and maintained development cost). So using entirely low-level favours battery life but increases development cost. Using high-level significantly reduces development cost but also battery life and (possibly) user satisfaction. Which side of the line you go for probably depends on the specific device. Popular opinion at the talk was that Python for a thermometer was reasonable and on reflection I am inclined to agree.

In conversation after the event, Adam B. from Simpleweb showed me an unusual (but very cool) little device called an iBeacon. For those unfamiliar with iBeacons, they are small, thumb-sized low-energy Bluetooth devices which you can track the location of. This allows tracking people as they move through a shop or similar areas. The devices shown to me were sealed units, extremely small (so no space for big memory chips and processors nor heat dissipation) and without a replaceable battery. But per-unit they are pretty expensive and typical use cases require longevity. Thus software for such a device is likely to need to be entirely low-level, for battery life, despite the fact that the devices themselves are easily replaceable. This is an example of a type (2) device better suited to C-based dev than Python-based dev.

This example brought us to think about the development process for the devices. Adam, Roger Shepherd, a few others and I discussed the following areas which we agreed make sense as ideas but need significant work to improve or integrate with standard IoT development practices:

  1. As an example, using a Creator CI40 for rapid development (in Python or otherwise), experimenting with features, nailing down an exact design and then creating the final product in proper low-level code (if necessary). In an ideal world, it would be an easy, automated process to go from Python to pure low-level so that any device can be developed for best battery life. As it stands at the moment, this isn’t possible, which brings me on to points 2 and 3.
  2. GCC and similar C compilers are a nightmare to set up. Which makes development with them flaky and hard to do, all of which contributes to extended development time.
  3. Also, the C language and C libraries have poor modularisation in most code bases and there is a distinct lack of open-source, free systems for C-based package management. Thus, dedicated IoT software is either written from scratch every time or bought (at great expense) from another company (but often the bought libraries aren’t stripped down to just what is required). Thus low-level development for IoT (in C) is currently very expensive whereas in Python, there is great package management and modularisation.

Furthermore, as highlighted in my talk, C development is only going to get more expensive, as knowledge and understanding of low-level development by graudates entering the IoT industry decreases and the onus falls on companies to train new developers.

In conclusion then, while the example I gave during the talk was not the strongest technical example, there is still a strong case for teaching low-level development in schools and universities (though not to the exclusion of everything else). Furthermore, if  as an industry we could perfect a technique for high-level prototype development with easy transition to production low-level code, that’d be great. It would cut development costs, improve products (and reduce hardware costs). In the meantime, we will have to rely on team leaders to make an informed per-device choice of the tools and language used.


The bug that went undetected for over a year…

Yesterday I announced that:

Just fixed a bug which has existed since the first week that I wrote FlingOS – so excited!!

I promised a blog post would follow, so here is that blog post – it’s going to be a good one. So sit back, relax and read on as I take you through the history of this bug.

When I first started writing FlingOS I had somewhere between no idea and less than no idea what I was doing. Seriously, all I knew was the structure of a C# to native compiler – I had worked on Cosmos for about 5 months but for various reasons I decided I wanted to write my own C# OS, with a different structure. I had my own compiler working relatively quickly and the next step was to implement basic features that would underpin the entire OS.

It’s probably reasonable to say that if something is going to underpin your entire system, you want to get it right, lest it have any nasty, invisible side effects later on. One such underpinning component was the Heap. Ahh the Heap… The heap implementation has caused much confusion and difficulty. This is not because a heap is difficult to understand or use, it’s just fiddly and crops up all over the place such that slight errors kill the entire OS. Some such errors have included not using spin locks (after I introduced multi-threading a few months back) and not allocating the heap enough space. (The heap space use to be allocated in the .TEXT section of the code! 120MiB .ISO files ;D With the new drivers compiler I shifted it to .BSS where it should be.)

When I first looked at implementing a heap, I wasn’t too interested in the internal workings. I knew what a heap did, I knew there were lots of ways of implementing them, each with pros and cons. I just wanted something simple and easy that I could use. Of course, FlingOS being one of only three active C# operating systems worldwide, there aren’t many (if any) suitable heap implementations floating around. However, there are lots of samples in C. The one I lumped for was a simple one from OSDev.

Over time I have adapted and updated the implementation to add things like allocation on or avoiding a boundary (as required by USB). The main Alloc function, however, has remained the same. Entirely the same. And this is where the issue lies. Early on in my development I found that with a 10MiB heap, my OS regularly seemed to run out of allocatable memory resulting in seemingly random page faults. My somewhat ignorant solution at the time was? : Make the heap 100MiB! This seemed to fix the problem, even though 90% of the heap was never allocated.

As time has gone on, page faults have appeared and disappeared sporadically until recently when I started trying to read large files from USB sticks. This used a lot of heap memory and suddenly the page faults were happening all the time. Not having really had to deal with page faults before I had no idea what was causing it. My instinct said that a page fault is due to unmapped memory, so something must be allocating an invalid pointer. But the heap wasn’t anywhere near out of memory. Unfortunately, with so many compiler changes going on in the past few months, there was no consistency to the issue. Even in the past few days the faulting address (or even instruction address) was not reproducible. It was seemingly random.

I investigated everything from interrupts to memory leaks to who knows what trying to trace this. Eventually I realised I wasn’t going to be able to unless I had a better view of two things:

  1. The sequence of events which lead to the page fault (and subsequent crash)
  2. The layout of all memory so I could see where things might be going wrong

For point (1) I had previously just outputted stuff to the screen through FlingOS’s BasicConsole class. But this wasn’t enough. I needed traceability and the ability to go back more than  a screen’s worth of information. So I implemented a new Serial class and hooked into the BasicConsole to redirect the output to a file on my host machine. As it turns out, I never needed to implement anything for point (2) – I realised what was going on before I got that far.

I realised the issue was to do with USB code, so I turned on all the trace code for the USB stack and inspected the output. The output contained the key piece of information : virtual and physical addresses of the memory the heap was allocating. They were invalid. They were valid addresses, but they didn’t fit inside the heap’s allotted block of memory! They were overrunning the end of the heap. I’d found my one, consistent piece of information.

Naturally I went looking for what could be overwritten by code writing to space beyond the end of the heap. Sure enough, immediately the heap memory were the unprotected page tables. And because USB uses physical addresses, there was no way I could have protected the page tables. I tested by allocating padding space between the page tables and the heap – sure enough the code took far longer to crash.

So the issue was in the heap. But the OSDev implementation looked pretty solid and many people had tested it. So I must’ve converted the code incorrectly to C#.  In the 18 months I’ve been doing low-level programming my understanding of pointers and pointer manipulation has grown – a lot. I went back to look at the heap in detail and found this spurious line of code:

void* result = (void*)(x * b->bsize + (UInt32*)(&b[1]));

This line of code is supposed to calculate the address of a block (x) with block size (b->bsize) and offset from the start of the heap (&b[1]). For those who understand pointer arithmetic they will easily see my mistake from when I converted the code – UInt32* will result in the pointer being multiplied by 4 (because UInt32 is 4 bytes in size). In my defence, however, the original line of code was thus:

return (void*)(x * b->bsize + (uintptr)&b[1]);

I asked a number of experienced programmers what they would expect uintptr to be a type for and all but one said: pointer to a uint (i.e. UInt32*). Only one was able to give me the actual definition (as per C99, which I found online) which is:

In C99, uintptr is “an unsigned integer type with the property that any valid pointer to void can be converted to this type, then converted back to pointer to void, and the result will compare equal to the original pointer”.

Great…so uintptr is not UInt32* it is in fact just UInt32 in C#.

Here’s a few caveats for those pedantic types amongst you:

  • Yes, pointers can be 8, 16, 32 or 64-bit. So it shouldn’t be UInt32 it should be some other form of UInt that allows agnostic size. However, FlingOS is entirely a 32-bit OS and C# doesn’t have a useful equivalent for uintptr (see next point).
  • Yes, C# has an IntPtr type – but it is intended for managed pointers and doesn’t play easily with most of the low-level code I’m trying to write for FlingOS. I may start using it in future, I may not. It might need some compiler updates to support it.

Detecting ATAPI drives

In the past few days I’ve been tackling a problem I’ve had for a while now – how to make ATAPI detection and retrieving device information reliable. I found that if I confined myself to a virtual machine then the existing code was pretty stable. However, with the large range of real-hardware I now have available to me, “it works in a VM” just wasn’t satisfactory. So I started testing and researching.

What I found was that I could reliably detect CD / DVD drives on all hardware. However, almost completely consistently, issuing the Device Identify Packet command resulted in the error bit being set. Yet my code worked exactly the same as many other people’s online examples. I reached the following conclusions:

  1. My code wasn’t doing something properly. It must be missing a step that would allow the ATAPI disc to respond properly.
  2. Other people’s code clearly hadn’t been tested on real hardware. There were various other indications of this which I won’t go into detail about here.

What I realised, however, was that once an ATA device has reported an error, it does not clear the error flag until you send it a new command. I also noted that part of the process of detecting an ATAPI disc, involves issuing the Identify command and then checking various registers to look for the PATAPI/SATA/SATAPI signatures. You check for the signatures even if the device reports an error.

So what was happening was some devices flagged up an error for the Identify command and some didn’t. The ones which did, required an additional command to be sent prior to the Identify Device Packet command otherwise it would still report an error. I went looking for a reset command and found one. Technically it only affects PATA/SATA not PATAPI/SATAPI devices. However, because it reset everything on the bus, and ATAPI devices have to be ATA responsive, ATAPI devices count this as a command. Thus issuing the Reset command clears the error flag. The problem was solved 🙂

Head over to this file on my dev branch in FlingOS’s BitBucket repository for sample Reset method code and usage.

Easy PXE Network boot

I had been meaning to set up a network boot system for FlingOS for a while. Yesterday I finally got around to it and after several hours of trying different software and solutions, I finally found one which worked nicely.

I had been meaning to set up a network boot system for FlingOS for a while. Yesterday I finally got around to it and after several hours of trying different software and solutions, I finally found one which worked nicely.

There is a modest selection of software out there which will let you set up PXE Network booting. The majority of it focuses around Windows installation and updating. What I needed was a system that would allow me to switch on any network-connected laptop and have it boot the latest version of FlingOS that I just compiled on my PC or main laptop. FlingOS already uses Syslinux as its bootloader so it made sense to use the Pxelinux variant of Syslinux. Unfortunately, Pxelinux requires something that most PXE Server programs don’t support – something called the tsize command.

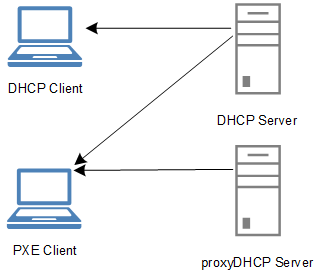
PXE relies on a combination of DHCP, Binl and TFTP to allow a PC to detect the availability of a PXE server and to retrieve the boot image(s). Pxelinux requires that the TFTP server supports the unusual tsize command. “tsize” allows Pxelinux to request the size of a file ahead of time i.e. before it starts to retrieve it.

After various attempts using Serva and other software, I came across TinyPXE. Finally something that would work. TinyPXE was written by a guy who needed a simple, effective, no-install solution to running a PXE server. Perfect. It even comes with support for Pxelinux, Grub and others. What’s even better, is that it can auto-load everything from a human-readable config file. So once you’ve worked out what setup you need, you can just put it in the config file and never have to worry after that.

Here’s a copy of the contents of my config file (config.ini):

[arch]
;will over rule the bootp filename or opt67 if the client arch matches one of the below
00006=bootia32.efi
00007=bootx64.efi
[dhcp]
;needed to tell TFTPd where is the root folder
root=G:\Fling OS\Fling OS\Kernel\Kernel\bin\Debug\DriversCompiler\ISO
;bootp filename as in http://tools.ietf.org/html/rfc951
;filename=ipxe-undionly.kpxe
filename=pxelinux.0
;alternative bootp filename if request comes from ipxe or gpxe
; altfilename=menu.ipxe
;start HTTPd
httpd=0
binl=1
start=1
dnsd=0
proxydhcp=1
;default=1
bind=0
;tftpd=1 by default
;will share (netbios) the root folder as PXE
smb=0
;will log to log.txt
log=0
opt1=255.255.255.0
opt3=192.168.43.1
opt6=192.168.43.1
opt28=192.168.43.255
;opt15=
;opt17=
;opt43=
;opt51=
opt54=192.168.43.120
;opt67=
;opt66=
;opt252=
poolstart=192.168.43.121
poolsize=20
;alternative bootp filename if request comes thru proxydhcp (udp:4011)
;proxybootfilename=
;any extra dhcp options
;my gpxe / ipxe dhcp options
optextra=175.6.1.1.1.8.1.1
;the below will be executed when clicking on the online button
;cmd=_test.bat
;if log=1, will log to log.txt
log=1
[frmDHCPServer]
top=441
left=258

Google Analytics spam data

I’ve been using Google Analytics on the FlingOS website for over 6 months now and while it is very good at tracking, with low-volumes of requests most of the tracking data is rendered useless. Spam websites such as free-social-buttons.com, ilovevitaly.com and simple-share-buttons.com log between tens and hundreds of requests per month. This leaves the remaining statistics heavily skewed.

These sites are performing these spam requests in an effort to get their referrer in your analytics list. This is in the hope that unwise web-admins will go to the referrer URL to see what is causing the traffic and then fall foul of the spoof sites which are there. These sites are distinct from auto-bots or search-engine crawlers in two primary ways. One is that crawlers don’t leave a referrer and often use a non-standard browser (or at least user-agent). Crawlers are not trying to pretend they are humans nor hide themselves. Crawlers also pay attention to do-not-follow headers, site maps and robots.txt files and so leave far fewer requests. Lastly, most crawlers are detected and automatically filtered by Google Analytics (based on the user-agent or other more sophisticated mechanism).

In an effort to reduce the level of spam, I switched on IIS’s IP blocking and reverse looked-up the various spam website’s IP addresses. This was, as it turns out, very effective. The number of visits with the targeted spam referrers almost entirely disappeared. Unfortunately, spam websites are relentless and as soon as you’ve eliminated one, another appears. I found myself endlessly updating the IP address block list. This is both tedious and dangerous because over time IP addresses shift, so the filter can potentially end up blocking genuine requests.

So how do I solve this problem? I don’t know! If you have any ideas, please let me know by commenting below or emailing me directly at flingos@outlook.com.

Rant of the week: MySQL Old Passwords

Description

Time for the rant of the week and this week it relates to the setup of this very blog. It was far from WordPress’s famous “5-minute setup” and here’s why:

Connect Error (2000) mysqlnd cannot connect to MySQL 4.1+ using old authentication

The full error message can be found below. This error message occurred when setting up the latest version of WordPress using MySQL, PHP and phpMyAdmin.

As with any technical problem, my immediate instinct was to Google this (after having read the error message of course). Sadly, I had no idea how to execute the suggested command and being part of shared hosting made that no easier. After some time Googling, the issue was clearly unresolved and had no clear answer. This page has a few more details about MySQL password hashing. So, here goes at my attempt.

Explanation

Simply put, this is a version compatibility issue achat viagra ligne. Version X of PHP doesn’t like working with Version Y of MySQL. But there is a solution and it IS what is written in the error message. It’s just fiddly to get it to work. Lots of online comments talk about the “old_passwords” variable being set. In fact, this is largely irrelevant. So here’s how to solve the problem.

Solution

You do may need to switch off the old_passwords variable (this only affects the current session so you don’t need super-user privileges) using:

SET SESSION old_passwords=0;

I was using phpMyAdmin (as that’s what my host provides). So, log in to phpMyAdmin, and ignore the “Change password” link – it won’t work. It doesn’t matter how many times you select to target version 4.1+ of MySQL, it still won’t actually use the updated hashing algorithm. The solution is to by-pass the phpMyAdmin logic entirely. From the home panel of phpMyAdmin (not within a database) open the SQL panel (link at top of the page).And then issue the command within the error message:

SET PASSWORD = PASSWORD(‘your_existing_password’);

The phpMyAdmin change password link actually issues the command with PASSWORD = OLD_PASSWORD(…) and hence the issue.

Full Error Message

Database connection fialed: mysqlnd cannot connect to MySQL 4.1+ using the old insecure authentication. Please use an administration tool to reset your password with the command SET PASSWORD = PASSWORD(‘your_existing_password’). This will store a new, and more secure, hash value in mysql.user. If this user is used in other scripts executed by PHP 5.2 or earlier you might need to remove the old-passwords flag from your my.cnf file