Following up: “Avoiding the UK IoT Disaster” (BrisTech, 2015-12-03)

I thought I’d take the time to write a short blog post following up on my presentation that I gave to BrisTech the other night (2015-02-03) titled “Avoiding the UK IoT Disaster”. In the talk, I highlighted not security or technical problems with IoT but a key educational problem that will be putting our industry at serious risk: Low-level development is not being taught in schools and is barely taught at Universities. Slides are available here.

During the presentation I highlighted a couple of possible problem-applications, where IoT devices are being programmed using high-level code (often Python) on top of an embedded Linux stacks. Such stacks and programming in Python allows rapid development and ease-of-update in future (which is useful/key for security) but sacrifices hardware efficiency and, even more so, battery life.

The specific example that I brought up was an IoT thermometer programmed in Python with wireless connectivity. I stated during the presentation that such a setup was not a good idea because thermometers were relatively simple devices that didn’t require such a complex stack and also that, as a device installed in a home, you would want a decent battery life.

This example caused some controversy and was the subject of a lot of the discussion at the end of the talk. One member of the audience, who works in the IoT industry, gave an interesting piece of analysis which is where I would like to start. His key point I feel worth highlighting is that, in his work, he sees three types of IoT device:

  1. Long-term, hard-to-replace devices, such as tremor and stress sensors built into bridges which often can’t be replaced, need to be extremely reliable and last a very, very long time (relative to standard technology cycles).
  2. Long-term, easy-to-replace devices, such as the thermometer example I gave earlier. These are devices which the user may want to have for a long time but they are easily replaceable.
  3. Short-term devices, where short-term is roughly the length of a standard technology cycle, 18 months to 2 years. These are devices which we would only expect to last that length of time before they need replacing.

The design approach for type (1) devices is relatively straightforward to analyse. These are devices which we may never be able to replace and which need to last a long time thus battery life is a top priority. So is reliability and security, which is easier to assure when there is less hardware and less software to test. Minimising the amount of hardware and minimising the amount of software executing for any length of time is key to increasing battery life. This is only possible using low-level software where modules can be stripped to a minimum and Python certainly doesn’t come under the heading of “low-power”.

The design approach for type (3) is arguably equally simple because the developers are likely to need the device to come quickly to market and to rapidly develop the next version and the version after that. This means Python and embedded Linux, which has regular security updates, and keep be developed and reasonably tested pretty quickly, makes sense.

The design approach for type (2) is what caused the most debate. Arguably, it is better for the user if the battery life is longer since, for a long-term device, it will be cheaper to not have to replace the battery or entire device so often. However, since the device can easily be replaced, it will probably not be an expensive, critical device with high per-unit margins (or at least, replacing the battery will be cheap so in the long-term, the per-unit profit is massively affected by the initial and maintained development cost). So using entirely low-level favours battery life but increases development cost. Using high-level significantly reduces development cost but also battery life and (possibly) user satisfaction. Which side of the line you go for probably depends on the specific device. Popular opinion at the talk was that Python for a thermometer was reasonable and on reflection I am inclined to agree.

In conversation after the event, Adam B. from Simpleweb showed me an unusual (but very cool) little device called an iBeacon. For those unfamiliar with iBeacons, they are small, thumb-sized low-energy Bluetooth devices which you can track the location of. This allows tracking people as they move through a shop or similar areas. The devices shown to me were sealed units, extremely small (so no space for big memory chips and processors nor heat dissipation) and without a replaceable battery. But per-unit they are pretty expensive and typical use cases require longevity. Thus software for such a device is likely to need to be entirely low-level, for battery life, despite the fact that the devices themselves are easily replaceable. This is an example of a type (2) device better suited to C-based dev than Python-based dev.

This example brought us to think about the development process for the devices. Adam, Roger Shepherd, a few others and I discussed the following areas which we agreed make sense as ideas but need significant work to improve or integrate with standard IoT development practices:

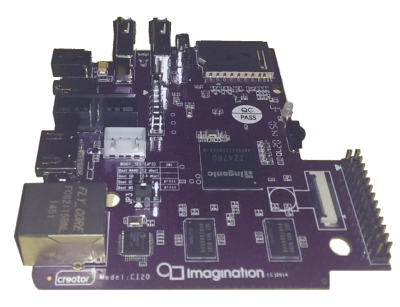
  1. As an example, using a Creator CI40 for rapid development (in Python or otherwise), experimenting with features, nailing down an exact design and then creating the final product in proper low-level code (if necessary). In an ideal world, it would be an easy, automated process to go from Python to pure low-level so that any device can be developed for best battery life. As it stands at the moment, this isn’t possible, which brings me on to points 2 and 3.
  2. GCC and similar C compilers are a nightmare to set up. Which makes development with them flaky and hard to do, all of which contributes to extended development time.
  3. Also, the C language and C libraries have poor modularisation in most code bases and there is a distinct lack of open-source, free systems for C-based package management. Thus, dedicated IoT software is either written from scratch every time or bought (at great expense) from another company (but often the bought libraries aren’t stripped down to just what is required). Thus low-level development for IoT (in C) is currently very expensive whereas in Python, there is great package management and modularisation.

Furthermore, as highlighted in my talk, C development is only going to get more expensive, as knowledge and understanding of low-level development by graudates entering the IoT industry decreases and the onus falls on companies to train new developers.

In conclusion then, while the example I gave during the talk was not the strongest technical example, there is still a strong case for teaching low-level development in schools and universities (though not to the exclusion of everything else). Furthermore, if  as an industry we could perfect a technique for high-level prototype development with easy transition to production low-level code, that’d be great. It would cut development costs, improve products (and reduce hardware costs). In the meantime, we will have to rely on team leaders to make an informed per-device choice of the tools and language used.

World first: C# kernel running on MIPS

Exciting news today as we announce our working kernel for MIPS based on the Creator CI20 board.

To the best of our knowledge, this is the first time in the world that anyone has got a C# kernel or operating system (of any form) working on a MIPS processor.

How did we do it?

We started the week by setting up the environment in which we were able to send a kernel binary file to the CI20. To see how this setup process is done, please read Ed’s post published earlier this week. After the connections were established we started to implement the necessary IL operations for the MIPS architecture to get the test kernel working.

The conversion of IL implementations from x86 to MIPS has been relatively smooth, except for the fact that in the MIPS architecture data stored in the memory must be half- or full-word aligned. This caused some initial headaches, however, Ed was determined to get to the bottom of the issue and in little time the problem was solved.

Other differences that required a lot of study and thought were related to the assembly code syntax for MIPS (GNU assembler – GAS) and the instructions available (reduced instruction set for MIPS). Although MIPS is a RISC architecture, meaning that more instructions must be used to perform the equivalent computation compared to x86, there are 16 general purpose registers available (as opposed to 4 on the x86) which makes implementation much easier. Furthermore, the programmer can also make use of pseudo-instructions which speed up implementation.

What does it do?

So what does the test kernel actually do? The answer is both not that much and quite a lot.

Although the functionality of the kernel is limited to changing the colour of the on-board LED and reading/writing characters from/to the UART ports, the fact that the kernel does that much proves that the FlingOS compiler is in a stable and solid state. It is a great proof of concept and initial step from which the new MIPS kernel can progress.

This has been a very exciting week and we are looking forward to completing the target architecture library and expanding the test kernel. In a few weeks time we will have a fully functioning IL compiler for MIPS.

Can I try it?

We’ll be releasing a compiler package and stable copy of the test kernel in the next month. We’d like to expand our compiler and proof-of-concept, test kernel a bit before releasing it to the wild.

Keep an eye on this space! Please ask questions below.

Ed and Roland

Stage 2 : Boot a custom OS

Earlier this week I tweeted that “Stage1: Boot a different OS – complete” meaning that I had successfully booted an alternative OS on the Creator CI20s (which were kindly provided by our sponsor Imagination Technologies®. Well, today I succeeded in booting a very basic custom operating system on the CI20s, so here’s how I did it.

For starters, I downloaded and installed the current compiler toolchain for Windows – Sourcey Codebench for MIPS available here. I installed mine to a non-standard directory but it works just fine. We’ll come on to how to use it later.

I also downloaded and install Putty and Serva – both of which are necessary tools. Putty provides a console interface to the serial connection required to talk to the CI20’s U-Boot bootloader. Serva provides an easy way to set up a TFTP server on Windows. Both of these tools are free. Again, we’ll come on to how to use them later.

Lastly, I had to buy one small (cheap) bit of extra hardware – a USB to UART converter. Be aware that there are two chips widely used to produce these devices. One of them only supports Linux and version of Windows 7 and earlier. The other chip supports Linux and all current versions of Windows – so make sure you get the right one! I bought one for Windows 8.1 (i.e. the second type of chip) from Amazon (with one day delivery on a Sunday no less!). I ordered from 3C4u who use Amazon. (The first time I tried to order two of these the package never arrived. I re-ordered and they were delivered fine. Amazon gave me a refund and Prime subscription extension for the first order so I’m not complaining too much!)

For the custom OS I wanted to try out something which I knew worked. So I went online and found Lardcave.net’s great series of tutorials on writing a custom CI20 OS. I cloned the Git repo and started following the instructions. For the USB to TTL chip I have, the tutorial is correct, you need to connect RXD on the converter to TXD on the CI20, and visa-versa for TXD on the converter and RXD on the CI20. To avoid having to use the power cable, you can also attach the 5V pin to abny of the CI20’s 5V_IN pins on the primary expansion header. The board will power on as soon as you connect the 5V pin so hold off until later for that! You’ll also need to connect an Ethernet cable to the same hub or switch your PC/laptop/WiFi hub is connected to – this will be so the CI20 can connect to the TFTP server.

After cloning the Git repo I ran across a few issues. The Lardcave.net tutorials were written for Max/Linux and for if you compile GCC yourself. Since I installed Sourcery CodeBench , the Makefile was not set up to compile properly. I eventually worked out how to it so it works properly. Here is a copy of my make file:

AS=mips-linux-gnu-as -mips32
CC=mips-linux-gnu-gcc
LD=mips-linux-gnu-ld
OBJCOPY=mips-linux-gnu-objcopy
CFLAGS=-Os

OBJS=start.o main.o

hello.bin: hello.elf
 $(OBJCOPY) -O binary $< $@

hello.elf: $(OBJS)
 $(LD) -EL -T linker.lds -o $@ $+

%.o: %.[Sc]
 $(CC) $(CFLAGS) -EL -c -o $@ $<

clean:
 rm -f *.o *.elf *.bin

I combined this with a simple batch script called build.bat in the same directory as the Makefile which allows me to specify the path to Sourcery CodeBench’s bin folder, instead of other version of GCC which I have installed. The batch script looked like this:

@echo off
SET BD=C:\Users\Ed\Documents\Coding\C\2015\MIPS\Compiler\bin
%BD%\cs-make
pause
@echo on

Where BD is set to the path to Sourcery CodeBench’s “bin” folder.

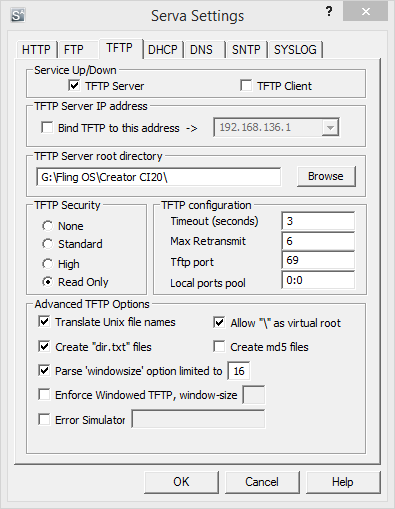
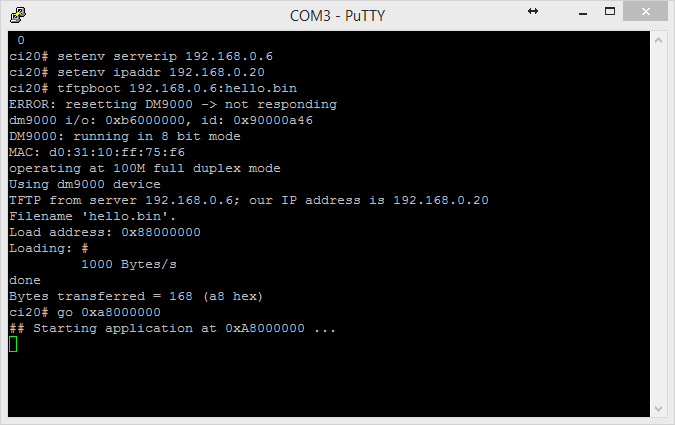
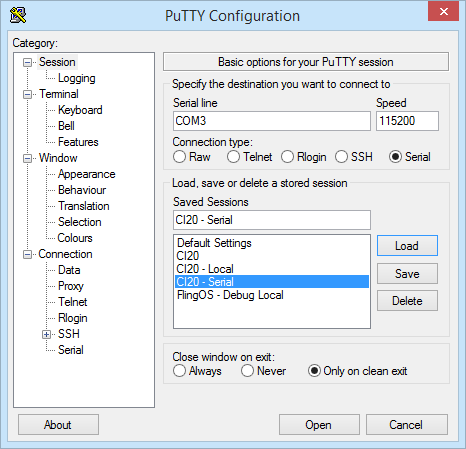
Having compiled the “hello.bin” file I proceeded to set up Putty and the TFTP server. Here are a series of images I took showing the process. By the time I was done entering the commands into Putty (also shown below), the CI20 showed the nice, purple LED as expected.

2015-08-02 - Putty Config
Putty configuration

For the Putty configuration shown above, remember to update the COM port name to the name of the COM port device on your computer. This can be found by opening Device Manager and looking under the Ports node of the tree.

Serva config
Serva config

For the Serva configuration shown above, remember to update the “TFTP Server root directory” to the same folder as your “hello.bin” file is in.

2015-08-02 - Putty Console
Putty console

For the commands to U-Boot, remember to replace the serverip “192.168.0.6” and the ipaddr “192.168.0.20” with values for your network. The IP should be the IP address of the computer which is running Serva (which can be looked up by doing “ipconfig /all” in a Windows command prompt on the server computer). The “ipaddr” can be any value you like but the first three parts must match the IP address of your server.

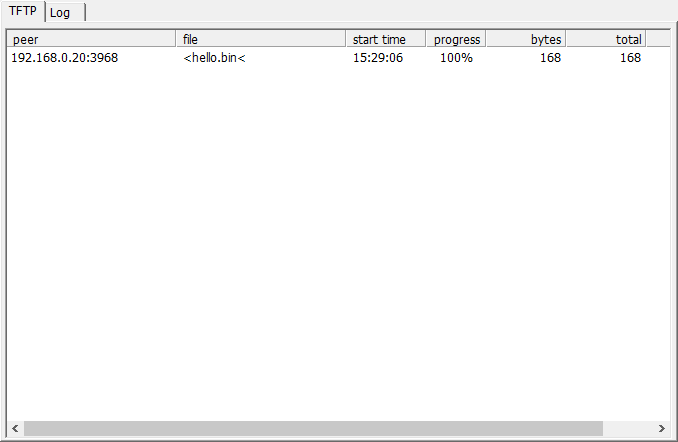
2015-08-02 - Serva Log
Serva log

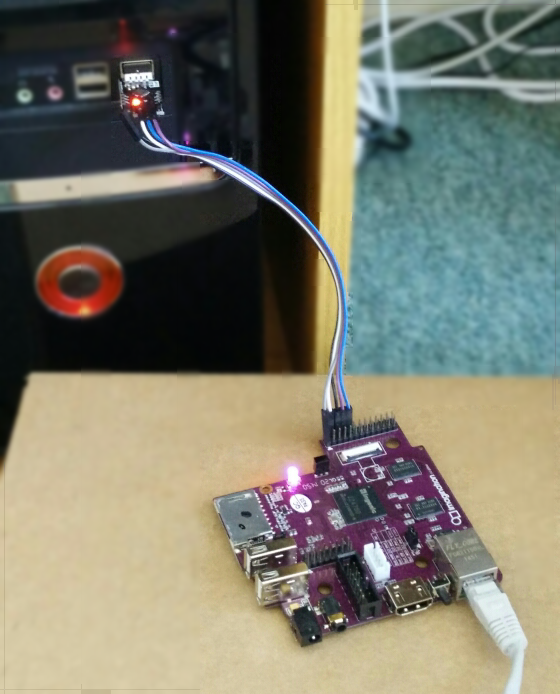
If the boot completes successfully, you should see a Serva log similar to the one above. The LED on the CI20 should turn purple as shown below.

Final result
Final result

It’s all about the compiler

Welcome back!

This week our focus was on the FlingOS compiler. We started with an introduction to the compilation process and the compiler itself. We also looked at the CI20 board and booted it up to observe its capabilities of running a full scale Linux operating system on it. This was very exciting!

Introduction to the compiler

I had spent some time learning how the intermediate language generated by MSBuild is translated into architecture specific assembly, especially how calls to methods are handled during this translation. I have observed the output of simple methods, such as adding two integers or displaying colour and text on screen for this purpose. I learned that understanding this process in the context of stack operations is particularly important, such as how arguments to methods and local variables are handled as well as how return values are passed back to the caller and how space is allocated for those return values.

After this introductory session, we jumped right into development tasks. This was related to shifting some architecture specific parts of the compiler into the x86 target architecture library. I learned that it is not desired to have a compiler which is architecture dependent because you may want to compile to different architectures using the same compiler. A generic compiler will make life easier when we port FlingOS onto MIPS.

Making a generic compiler

The task of shifting assembly generation from the compiler to the x86 architecture library has proven to be more difficult than I expected. I realised that I did not have the necessary insight into how the compiler functions at deeper levels. However, with some help from Ed, I was able to complete the tasks. As it turned out, I wasn’t actually that far off from the correct solution. Nevertheless, I felt that I was thrown in at the deep end, and since I almost drowned, Ed decided that I should spend some more time studying the compiler in more detail. He kindly produced a document explaining the structure of the compiler and how the different classes and methods are involved in the compilation process. I have been studying this document along with the code itself to gain a better understanding. By the end of the week, the compiler has been changed to a fully generic version and the MIPS target architecture library has been also added to the project by Ed. Although the actual implementations are yet to be completed in the coming weeks.

Plans for Week 4

Next week, I am going to be continuing to solidify my knowledge of the compiler and soon we will begin working on porting FlingOS onto the MIPS architecture.

See you all next week.

Roland

The future’s so bright, I gotta wear shades…

Welcome back to my weekly update on my journey through the wilderness of OS development.

I’ve had a very enjoyable and productive week. I am still in the training phase of my internship but I can tell you now, within a few weeks, once I know enough about FlingOS, even more exciting things are going to be happening. Before I reveal more, let’s see what we’ve done this week.

Assembly to C

We have started the week by converting blocks of assembly code into C for the purposes of the upcoming tutorials in the context of memory and interrupts. The reason for this is that in the tutorial videos, equivalent implementations of the different development phases will be provided in three different languages; assembly, C and C#. This will be useful in seeing how each steps can be developed using the different languages, therefore you can decide which implementation suits your needs best.

We started by setting up the page directory and the page tables for the purposes of virtual memory management. Once that was achieved (after some frustration with pointers on my part) we set up memory to contain the kernel in the higher-half of the virtual memory space. This has advantages later when multiprocessing is desired. I learned about how to combine C code with assembly by the use of global procedures and data types as well as how one can use inline assembly to inject machine code directly into a C program. Mixing C with assembly can be useful as the implementation of certain tasks can be more straightforward in a high-level language. We have also spent some time setting up the Interrupt Descriptor Table entries in C. By working on this task with Ed, I learned, amongst other things, that the programmer can specify custom bit sizes for data types by using bitfield operators.

Getting to grips with C#

The second half of this week was spent on familiarising myself with C#. For this purpose, I have been looking at online tutorials on TutorialsPoint and on the Microsoft Developer Network site. I enjoyed learning about C#. It seems like a cool language to learn. I particularly like the documentation comment feature of the language. I think it’s very neat that you can leave comments in your code which then can be compiled into professional looking XML documentation resources. I also like the fact that C# is a type-safe language, so no need for pointers (yay from me). On the other hand, if you need to use pointers, you can declare “unsafe” blocks in your code where you can make use of them.

Plans for next week

Next week, I am going to be learning about the structure of the FlingOS compiler. I will be familiarising myself with the internal workings of the compiler by tweaking different parts of it and observing the output it produces. I will be able to put my newly found C# knowledge into good use since the compiler is written in this language. I will also be looking into how the compiler translates C# code into Intermediate Language code and how that IL code is translated into machine instructions. I am looking forward to tweaking the compiler to learn more about FlingOS and its internal workings. So, back to the exciting things I mentioned at the beginning of the post!

“Things are going great, and they’re only getting better”

Within the next few weeks, we are hoping to get started with porting a scaled down version of FlingOS onto our sponsor’s Creator CI20 development board. This means the translation of the existing x86 based code into code suitable for the MIPS32 architecture. A large part of the translation process involves converting CISC assembly instructions (x86) to RISC machine code used by MIPS32. Porting FlingOS onto the Ci20 board will be an exciting challenge and I will provide you with the details once we get started so you can consider developing your own OS on this great piece of kit.

That’s it from me, please come back next week for more info.

Roland

MIPS / CI20 Custom OS

Want to write your own OS for Imagination Technologies® CI20? Or just want to investigate making a custom OS for MIPS? I’ve found a blog that has some great, practical content: Lardcave.net’s CI20 Bare-metal articles

The articles are written for people using Mac OSX but there’s sufficient information, when combined with the CI20 Wiki, for Linux and Windows users to get the project working. It also helpfully includes links to eBay for USB to Serial boards connecting wires.

Will we ever see FlingOS running on the CI20? Maybe but not for a little while yet. If anyone fancies having a go at porting FlingOS, by all means head over to the Join page!